Making stars
Table of Contents
Create realistic looking star images using Python
Why make stars?
I want to test software I’m developing to determine pointing and disortion information. This requires a realistic star field where the pointing and distortion are known. The only way to get this is to make the star field yourself.
Making the first version
There will be a follow up to this article about adding a point-spread function (PSF) to the star field. But for now, we’ll stick with Gaussian stars.
Imports and packages
We only need a few packages for this work: pandas, numpy, maptlotlib, astropy, and photutils.
import pandas as pd
import numpy as np
import matplotlib.pyplot as plt
from astropy.wcs import WCS, NoConvergence
from astropy.coordinates import SkyCoord
from astropy.table import QTable
import astropy.units as u
from photutils.datasets import make_gaussian_sources_image, make_noise_image
Getting a catalog
To make stars in real positions, we need a catalog. We’ll use the Hipparcos catalog.
HIPPARCOS_URL = "https://cdsarc.cds.unistra.fr/ftp/cats/I/239/hip_main.dat"
def load_raw_hipparcos_catalog(
catalog_path: str =
) -> pd.DataFrame:
"""Download hipparcos catalog from website.
Parameters
----------
catalog_path : str
path to the Hipparcos catalog
Returns
-------
pd.DataFrame
loaded catalog with selected columns
"""
column_names = (
"Catalog",
"HIP",
"Proxy",
"RAhms",
"DEdms",
"Vmag",
"VarFlag",
"r_Vmag",
"RAdeg",
"DEdeg",
"AstroRef",
"Plx",
"pmRA",
"pmDE",
"e_RAdeg",
"e_DEdeg",
"e_Plx",
"e_pmRA",
"e_pmDE",
"DE:RA",
"Plx:RA",
"Plx:DE",
"pmRA:RA",
"pmRA:DE",
"pmRA:Plx",
"pmDE:RA",
"pmDE:DE",
"pmDE:Plx",
"pmDE:pmRA",
"F1",
"F2",
"---",
"BTmag",
"e_BTmag",
"VTmag",
"e_VTmag",
"m_BTmag",
"B-V",
"e_B-V",
"r_B-V",
"V-I",
"e_V-I",
"r_V-I",
"CombMag",
"Hpmag",
"e_Hpmag",
"Hpscat",
"o_Hpmag",
"m_Hpmag",
"Hpmax",
"HPmin",
"Period",
"HvarType",
"moreVar",
"morePhoto",
"CCDM",
"n_CCDM",
"Nsys",
"Ncomp",
"MultFlag",
"Source",
"Qual",
"m_HIP",
"theta",
"rho",
"e_rho",
"dHp",
"e_dHp",
"Survey",
"Chart",
"Notes",
"HD",
"BD",
"CoD",
"CPD",
"(V-I)red",
"SpType",
"r_SpType",
)
df = pd.(
,
sep="|",
names=,
usecols=["HIP", "Vmag", "RAdeg", "DEdeg", "Plx"],
na_values=[" ", " ", " ", " "],
)
["distance"] = 1000 /["Plx"]
df =[["distance"] > 0]
return df.[.(["Vmag"])]I recommend saving this as a CSV file and then opening it as needed instead of downloading it every time.
Filtering for relevant stars
There are a lot of stars in this catalog. We may only want to show up to a certain magnitude. Filtering on Pandas dataframes is easy though.
def filter_for_visible_stars(
catalog:.,
dimmest_magnitude: float = 6
) -> pd.DataFrame:
"""Filters to only include stars brighter than a given magnitude
Parameters
----------
catalog : pd.DataFrame
a catalog data frame
dimmest_magnitude : float
the dimmest magnitude to keep
Returns
-------
pd.DataFrame
a catalog with stars dimmer than the `dimmest_magnitude` removed
"""
return[["Vmag"] <]In addition, not all the stars will be visible in our image. A world coordinate system or WCS describes where an image is in the sky. We’ll use it to determine the pixel coordinates of each star and then throw away those outside the frame.
def find_catalog_in_image(
catalog:.,
wcs:,
image_shape: (int, int),
mode: str = "all"
) -> np.ndarray:
"""Using the provided WCS converts the RA/DEC catalog into pixel coordinates
Parameters
----------
catalog : pd.DataFrame
a catalog dataframe
wcs : WCS
the world coordinate system of a given image
image_shape: (int, int)
the shape of the image array associated with the WCS,
used to only consider stars with coordinates in image
mode : str
either "all" or "wcs",
see
<https://docs.astropy.org/en/stable/api/astropy.coordinates.SkyCoord.html#astropy.coordinates.SkyCoord.to_pixel>
Returns
-------
np.ndarray
pixel coordinates of stars in catalog that are present in the image
"""
try:
xs, ys =(
ra=.(["RAdeg"]) *.,
dec=.(["DEdeg"]) *.,
distance=.(["distance"]) *.,
).(, mode=)
except NoConvergence as e:
xs, ys = e.[:, 0], e.[:, 1]
bounds_mask = (0 <= xs) * (xs <[0]) * (0 <= ys) * (ys <[1])
reduced_catalog =[].()
["x_pix"] =[]
['y_pix'] =[]
return reduced_catalogMaking the actual star image
Finally, we can write a straightforward function to make a star field.
It’ll use all our other work until now.
We provide it with a wcs, the dimensions of an image (img_shape), and the full-width-half-maximum (fwhm) of our Gaussian PSF for stars.
There are a few other helpful parameters here too.
For example, mag_set and flux_set work together to scale the star brightnesses.
If mag_set=0 and flux_set=500_000 then stars with magnitude 0 in the catalo will have a flux value of 500_000.
All other magnitude stars are scaled accordingly.
We also sometimes want to add noise. We can currently add a Gaussian noise with mean of noise_mean and standard deviation of noise_std.
If these parameters are set to None, then no noise is added.
Finally, we can control the dimmest_magnitude to limit what magnitude stars are shown. The more stars you show, the slower the code is.
def simulate_star_image(wcs,
img_shape,
fwhm,
wcs_mode: str = 'all',
mag_set=0,
flux_set=500_000,
noise_mean: float | None = 25.0,
noise_std: float | None = 5.0,
dimmest_magnitude=8):
sigma = fwhm / 2.355
catalog =()
filtered_catalog =(,
dimmest_magnitude=)
stars =(,
,
,
mode=)
star_mags =['Vmag']
sources =()
['x_mean'] =['x_pix']
['y_mean'] =['y_pix']
['x_stddev'] = np.(len())*sigma
['y_stddev'] = np.(len())*sigma
['flux'] = flux_set * np.(10, -0.4*( -))
['theta'] = np.(len())
fake_image =(,)
if noise_mean is not None and noise_std is not None: # we only add noise if it's specified
fake_image +=(, 'gaussian', mean=, stddev=)
return fake_image, sourcesSo let’s run it!
m = 1
shape = (1024*m, 1024*m)
w =(naxis=2)
w.wcs.crpix =[1] / 2 - 0.5,[0] / 2 - 0.5
w.wcs.crval = 0, 0
w.wcs.cdelt = 0.0225, 0.0225
w.wcs.ctype = 'RA---ARC', 'DEC--ARC'
img, stars =(
,
,
fwhm=3,
dimmest_magnitude=12,
noise_mean=10,
noise_std=5)And visualize it.
fig, ax = plt.()
ax.(
,
vmin=0,
vmax=100,
cmap='Greys_r'
)
ax.()
fig.(
"first.png",
bbox_inches='tight'
)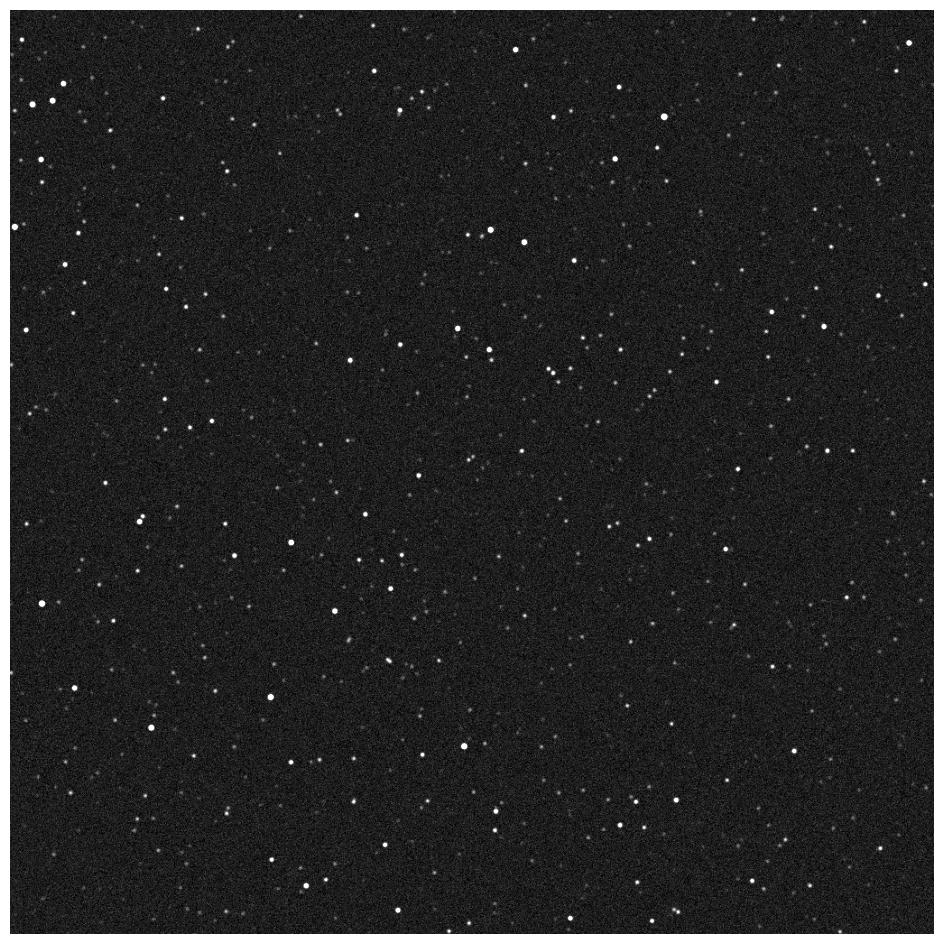
Note that our WCS here is rather simple, but we could have added a distortion model too and that would’ve been applied.
Be careful to set wcs_mode=all in that case.
Conlusions
This makes a rather convincing initial star field. But it lacks shot noise, a complex PSF, and other effects that we may want to simulate.
In the follow up to this article, we’ll add those.